3 Clever Ways to Turn Shoeboxes into Wall Art
BY : LAUREN WEEMS.
Let’s be honest, who doesn’t have a ton of old shoeboxes laying around? With Earth Day just around the corner, we decided it was time to put them to good use and came up with 3 beautiful ways to upcycle them. After seeing the fun things we came up with, we’re betting you’ll also want to give all your shoeboxes a brand new life by turning them into wall art, map picture frames, and colorful shelves.Here’s a preview of what your workspace might look like if you make all three projects! :)
1. Fabric Panels: Covering the lids of your shoeboxes in fabrics and studs in easy way to create custom wall art. This project will turn any bland wall into a colorful focal point in your home or office.
Supplies:
– 3 shoebox lids– Mod Podge
– white paint
– 12 studs
– 3 fabrics, 1/2 yard of each
Tools:
– 2 paintbrushes
– tape
– scissors
– pencil
Start by cutting a piece of fabric large enough to wrap around each lid.
Paint the top and sides of each lid all white to prevent any logos or color showing through. When that is dry, paint the entire lid with Mod Podge. Repeat with all 3 lids.
Place your lid upside down in the center of the fabric. Fold the sides of the fabric up and smooth flat against the sides of the box. Now fold the top and bottom pieces like a present; then fold it up flat against the top and bottom sides of the lid as well. You may need to secure the fabric with tape or hot glue to hold it in place while the Mod Podge dries.
Tuck all the loose fabric ends down inside the box and secure with Mod Podge or tape. Flip your lid over – doesn’t it look great?
To put in the studs, make 2 slits with an exacto knife or scissors and press the prongs of the stud into it. Place a stud at each corner. Repeat this process until you have completed as many panels as you like.
Hang them on a wall and enjoy! They are very light weight so all you need is a couple push pins to hang each one.
You could easily make more than 3, or make bigger ones using several shoebox lids glued together.
We found the outdoor fabric section at our local fabric store had the coolest patterns, but you could use any scraps of fabric you already have around the house.
2. Shadowbox Map Frames: This is a fun way to celebrate special moments in life because you get to combine the photos and the map of the place the moment happened!
Supplies:
– 3 shoebox lids
– cardboard scraps
– Mod Podge
– maps (we used an atlas)
– photos
Tools:
– scissors
– foam brush
Start by positioning the map where you want it to be and fold it and or cut it to size. It’s easier to get this all figured out before there is any glue involved. Then cover the top and sides of the lid with Mod Podge.
Press the map into place and smooth out any air bubbles. Paint a layer of Mod Podge on top of the map once it’s in place.
Repeat this process until you have covered the entire lid. Then do the same with the other 2 lids. To raise up your photo so it looks like it’s floating in the frame, cut little squares of cardboard and glue them into a stack in the center of the frame.
You could also use the Mod Podge to glue the stack, but if you’re in a hurry a hot glue gun also works.
Use the Mod Podge or hot glue to attach your photo. Be sure to center it!
Hang them anywhere you like!
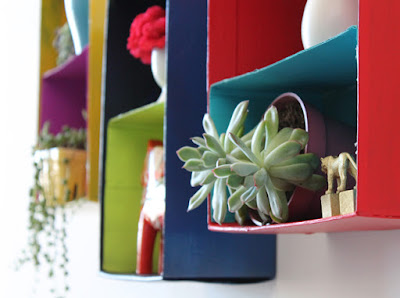
3. Brightly Colored Shelves: Create a colorful place to store your favorite knick-knacks by turning shoeboxes into shelves!
Supplies:
– 3 shoeboxes
– painter’s tape
– 6 colors of paint (acrylic paint or spray paint works)
Tools:
– foam brushes
– hot glue gun
Paint the inside bottom of each box a different color. After it dries, tape it off. Then paint the rest of each shoebox a different color. Create a shelf to go in each one by cutting apart the lids.
We started by using acrylic craft paint, but decided that was too slow, so switched to spray paint for the shelves and the final coat on each box.
Remove the painter’s tape and glue your shelves into place.
Hang them on a wall and enjoy!
This could also be cute above a desk to store office supplies, or near an entry way to hold keys and spare change.
We can’t decide which of these new creations we like best, so we are using all 3!
Source : BRIT+CO


Comments
Post a Comment