Posts

Showing posts from May, 2018

How to Make Natural Easter Egg Dye from Ingredients in Your Kitchen

Image
GETTY IMAGES Sometimes making things the old-fashioned way is best—and that's especially true when it comes to Easter egg dyes. Your kids might beg for the egg dying kits filled with glitter and stickers, but if you're ready to ditch the chemicals and go au naturel this Easter, you can easily make the switch thanks to a few ingredients that you probably already have in your pantry. The perfect complement to your home's farmhouse style, these naturally dyed eggs will look great gathered in a basket as a rustic Easter brunch centerpiece—and your kids will love helping along the way. Not only will you save some money by making your own dye, it's also easy to store in your fridge to save for periodic egg decorating sessions throughout the Easter season. GETTY IMAGES What you'll need: 3-quart pot  Strainer   White vinegar  Salt  Disposable plastic gloves Dye color cups Directions: Each dye color requires the same process—you

3 Clever Ways to Turn Shoeboxes into Wall Art

Image
BY :  LAUREN WEEMS .   Let’s be honest, who doesn’t have a ton of old shoeboxes laying around?  With Earth Day just around the corner, we decided it was time to put them to good use and came up with 3 beautiful ways to upcycle them. After seeing the fun things we came up with, we’re betting you’ll also want to give all your shoeboxes a brand new life by turning them into wall art, map picture frames, and colorful shelves. Here’s a preview of what your workspace might look like if you make all three projects! :) 1. Fabric Panels: Covering the lids of your shoeboxes in fabrics and studs in easy way to create custom wall art. This project will turn any bland wall into a colorful focal point in your home or office.     Supplies : – 3 shoebox lids – Mod Podge – white paint – 12 studs – 3 fabrics, 1/2 yard of each Tools: – 2 paintbrushes – tape – scissors – pencil   Start by cutting a piece of fabric large enough to wrap around each lid. Paint the top and sides

A DIY Statement Necklace That Wows

Image
"During this special time of year, a DIY project can not only yield a thoughtful gift, but can be a great opportunity to gather your friends and family together for a fun "crafternoon." By Madeline Trait of By Madeline Trait PHOTOGRAPHY BY: LISA ANDERSON SHAFFER With our love of vibrant prints, a similar design aesthetic, and lots of laughter leading the way, we created this fun DIY statement necklace that you can do in just 90 minutes. Give it a try and you will be looking like a fashion-forward femme fatale in no time. PHOTOGRAPHY BY: LISA ANDERSON SHAFFER MATERIALS :   90 minutes At least 1 yard of fabric Scissors Iron Wood beads -- we used 1-inch and 3/4-inch beads but you can choose any size you like Embroidery thread Sewing needle  PHOTOGRAPHY BY: LISA ANDERSON SHAFFER STEP 1: Cut your fabric into strips. For 1-inch beads the fabric needs to be 2.5 inches wide. For the 3/4-inch beads the fabric needs to be 2 inches wide. All strips s

How to: Make DIY Colorful 3D Geometric Wall Art

Image
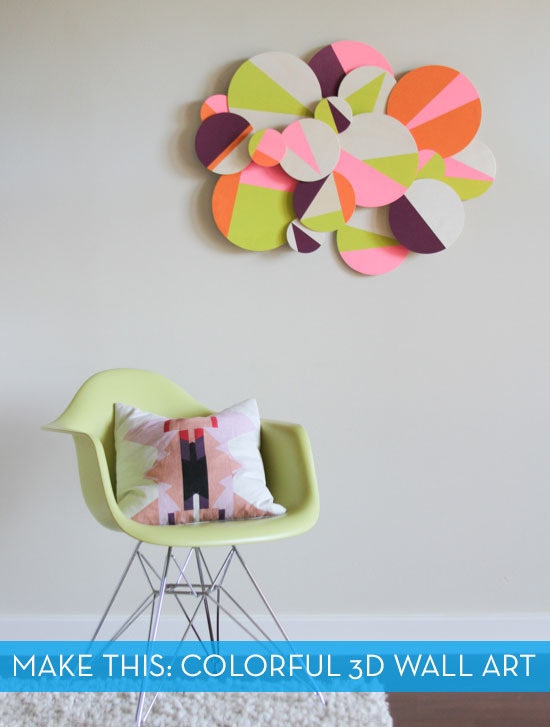
By: Brittni mehlhoff                                                                            Photo: Brittni Mehlhoff I created a three-dimensional piece of wall art that is easy to install and relatively inexpensive to make (the final budget came in under $50). Aside from wall art, this project also doubles as a photo booth prop, and if you have the time, it would make an awesome photo booth backdrop too. Want to learn how to make your own? Get the full tutorial and see the finished piece after the jump. Before you get started, I wanted to touch on color schemes for a second. I thought a lot about the colors I wanted to use beforehand, and had originally selected five colors to use. The fifth color didn't end up working well with the rest, and so I ended up scratching it after a few botched circles.  So what is the lesson here? Don't be afraid to ditch a color if it's not working. I also recommend sticking to a five color maximum. In this case, the wood ac

DIY Gretchen Jones Necklace

Image
by Erica in D.I.Y. A couple of months ago, while visiting New York, we met the lovely Gretchen Jones and were fortunate enough to spend an entire day crafting in her über charming Brooklyn apartment. Not only is she amazingly talented and fascinatingly storied, Gretchen is one of the most humorous and genuine people we’ve gotten to know. After raiding a local hardware store for supplies and hardware, we spread out over her workspace, and whipped up several pieces of jewelry while sharing anecdotes. One of our favorite pieces was a necklace inspired by the honeycomb Universe necklace from Gretchen’s collection. With some brass rings, neon cording and a clever trick courtesy of Ms. Jones, this bold statement necklace is a cinch to DIY! (PS scroll down for the giveaway details!)     You’ll need:    various sized brass rings    neon nylon mason line cord    scissors    lighter      Start by laying out a pattern. Even though we ultimately changed the pattern, it’s a good